Car Donut SmokeTrail- Week 3
A reminder of the goals for this week and a synopsis of whether they were reached.
Goals for Next Week are as follows-
Find the correct Density of the Smoke - ✅
Find whether Micro Solvers are needed in the Smoke simulations - Pushed to Week 4 ❌
Separate the smoke into 2 simulations - ✅
Compress the simulation - ✅
Finish Articulating the Car along the Curve - ✅
Test Simulation with Animation - ✅
Set Dressing- Set dress started ❌
Render Setup - ✅
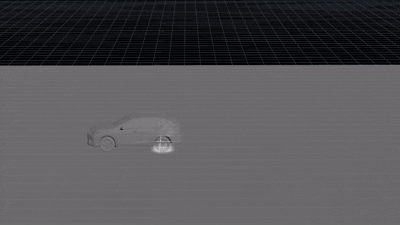
With the reminder of the goals that were in mind for this week, lets head into the heart of the project. Currently I am working on a render test to confirm whether the smoke shows.

Smoke Cloud Test Render
During this I was able to start set dressing and complete my render setup. Set dressing is in the starting phase as I need to fully breakdown the car mesh prior to the RBD nodes as they pack any and all information that would make it easy to apply materials. Node Setup and pathing for all relevant Materials has been started.

Current Full Network Stage Setup

Material Library Setup
To save both on simulation time and general resources, methods to create large amounts of density were found. 1 method can be found in the material of the volume when editing the look of the volume, while the other still relies on the simulation itself and not the generated points.

Karma Pyro Shader Attributes and Density Scaling

Density Scale Comparison- Heavier Density causes heavier Inset shadows
Work is needed on both the following Large and Small simulations in regard to Smoke shape, start time, and dissipation of the volume.
Multiple Passes of the Large Sim were done to find attributes that fit with the reference Smoke. During this week all simulation smoke was done at the voxel size of 0.1 to allow for constant re-runs of the simulation and to gain an idea of the smoke shape. Changed Attributes for Each Pass are listed as Descriptions.
Constant Attributes
Voxel Size - 0.1
Buoyancy Scale - 0.01
Average Simulation Cache Time- 3 minutes 30 seconds
Velocity Scale- 1 (unless stated)
Disturbance Base Block Size = 0.1

Large Sim Pass 01
Dissipation - 0.1
Disturbance - 15
Turbulence - 1
Large Sim Pass 02
Dissipation - 0.1 with a decrease to 0.001 after 120 frames
Disturbance - 10
Turbulence - 0.5

Large Sim Pass 03
Dissipation - 0.2 with a decrease to 0.001 after 120 frames
Disturbance - 5
Turbulence - 2

Large Sim Pass 04
Dissipation - 0.2 with a decrease to 0.005 after 120 frames
Disturbance - 5
Turbulence - 2
Velocity Scale - 2

Large Sim Pass 05
Dissipation - 0.2 with a decrease to 0.005 after 120 frames and then another decrease to 0.001 after another 120 frames
Disturbance - 5
Turbulence - 3
Velocity Scale - 2

Large Sim Pass 06
Dissipation - 0.2 with a decrease to 0.005 after 120 frames and then another decrease to 0.001 after another 120 frames
Disturbance - 10
Turbulence - 3
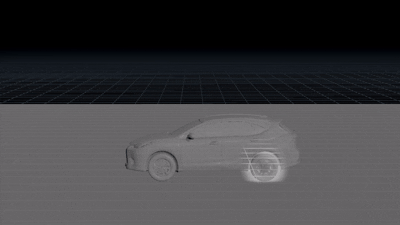
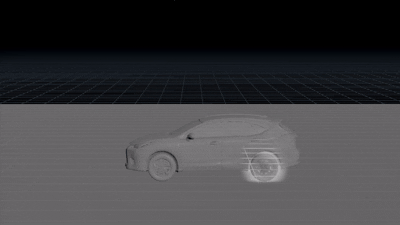
Below is a simulation test using pass 06 of the Large sim on animated version of the car via the RBD Car Follow Path node.

Animated Simulation Test
This marks the start of the Small sim passes. The focus was for there to be not much spread of the simulation past the wheel well, though as you may see, it is currently not at the small size that I am working towards. The constant attributes that were listed for the Large sims are still the same for this portion of the simulations.

Small Sim Pass 01
Dissipation - 1 to 0.1 over 120 frames
Disturbance - 15
Turbulence - 3

Small Sim Pass 02
Dissipation - 1 to 0.5 over 120 frames
Disturbance - 5
Turbulence - 0.5
Frames before Solve - 24
Small Sim Pass 03
Dissipation - 1 to 0.9 over 120 frames
Disturbance - 5
Turbulence - 0.3
Small Sim Pass 04
Dissipation - 1
Disturbance - 5
Turbulence - 0.3
Prior to separating the 2 simulations, separating the velocity of each was needed and easily done by specifying the points on which the sim reacts. The Large sim only taking from the bottom of the tires, while the Small sim takes from the outside rim of the tires.

Left Side is for the Large Sim | Right Side is for the Small Sim

Left Side is for the Large Sim | Right Side is for the Small Sim
Compressing the Smoke Simulation was quite easy with only 2 additional nodes from the previous setup. Adding the nodes Convert VDB and Primitive with minor changes allows for heavy compression of the simulation, basically taking the file from at least 50GB to 2GB. This method comes from Professor Deborah Fowler.
Fowler, Deborah. “RBD Tips- Reducing Cache Size for Smoke.” Deborah Fowler, 1 Sept. 2022, deborahrfowler.com/HoudiniResources/MiscSources/RBDTips.html.

Compression Additions- Convert VDB node

Compression Additions- Primitive Node

Compression Additions- Full network with integrated nodes for Compression
RBD Car Rig and Follow Path Setup
After the recommendation to look into the new Houdini 20 RBD Car rig node by Professor Fowler, I found that my rubber portions of my tire were breaking the rig for some unknown reason. This was easily remedied by separating the portions of the wheels and remeshing them prior to grouping and merging.

Full break down of the Car Model
After fixing the tires, the model can be feed into the RBD Car Rig node and setup by setting the car to all wheel drive, and letting the node know which group contains all the wheels. Speed and other variables are available in this node, though for the simulation passes above, only speed and brakes were used.

RBD Car Rig Node Setup

Visualization of the RBD Car Rig
After the Car rig is setup, I was able to work on the Curve that it would follow. A simple curve, some resampling, and smoothing it out allowed me to recreate the motion the car in my Reference Takes.

Curve Path

Curve Path Visualization after Input into RBD Car Follow Path node
Once the path is made, it can be plugged into the RBD Car Follow Path node where a slider is created for the curve position that the car will match once animated. Attributes for drifting and its offset can also be found here, making it easier to animate the car drifting.

RBD Car Follow Path node Attibutes

Full Curve Path Network and Car Rig Network
Goals for Next Week are as follows-
Render Farm test - Important to verify setup Works
Add Micro Solvers to the smoke if found needed - Possible addition of Variation in shape of Smoke
Correct the shape of the Small Sim - Too large and can be remedied by shrinking Voxel Size
Correct the shape of the Large Sim - Staying too low to ground, Lifting Dissipation and Buoyancy to allow for more movement
Correct Starting and ending movement of the Car - Starting and Ending angle is incorrect
Finish Set Dressing - Make the set look professional or appropriate
Lighting - Shadow is too harsh and needs to be softened
Create Skid Marks - Added effect to play realism to the eye