RBD Destruction of a Bottle
The focus for the project was to break an object and attempt to achieve a real or believable break of the object. Not only a fracture but also using debris simulations to achieve a more believe break with all the small to micro fracture portions going everywhere. Pyro clouds of dust were also allowed, though with my chosen reference and fracture object, pyro clouds were not needed to achieve believability.
Below is the reference video that I used and tried to make throughout the process
Firstly, I gathered the parts needed for the simulation and luckily enough I already had a Mexican sprite bottle pre-done from another project.
After confirming that the bottle was the right shape, I brought it into Houdini and set it up for a custom fracture. Noting the break points on the original bottle when slowed down, we can see that the bottle breaks both at the point of contact and at the lip of the bottle after bouncing. Focusing volume painted on a paint fog volume allowed for me to paint a custom fracture that would focus on both of those areas. The volume paint and network is as shown.

Custom Volume Fog Paint

Result of the Custom Volume Fog Paint

Volume Fog Network
After the Custom Fracture was painted to match areas of the breakage, I took the fracture and moved it up in Y to mimic the height that it possibly fell from in the reference video. From there the RBD Glued Objects preset was used from the Rigid Bodies Shelf to obtain the dop network to continue working on the project. Though prior to having to start the sim to break the object, I would need to paint the glue strength constraints properly. Making sure to only paint in areas where I needed to make sure that it did not break as easily, particularly this portion of the network primarily only affecting the main body of the bottle. Afterwards, promoting the glue strength constraints to make sure that they could be read in the simulation network.

Glue Strength Constraints Painted
Moving into the simulation, I first start off by trying to get similar physical attributes of both the ground and bottle surfaces. Both of which I want to show you below.

Bottle Physical Attributes

Ground Physical Attributes
Once I was able to get similar physical attributes to both of the surfaces, then I was able to move onto simulating the fracture hitting the ground. The bullet solver was slightly changed to better handle the sim with the substeps being raised to 20.

Bullet Solver Attributes
Though at this point, it could be seen that after hitting the ground at the velocity produced that the fractured parts would continue to move on forever or at least past what was needed for the simulation. To solve this, I introduced a custom drag attribute that was applied using a wrangle node and merged it into the network using a multisolver node.

Custom Drag Wrangle

Full Initial Fracture Network With Multisolver
After the initial network was setup, then the glue constraints were applied using the glue strength attribute that was made earlier. No attributes here were changed expect the strength that was applied to the glue constraints. Then the glue constraints were merged with the initial fracture network in a constraint network node to make sure they were interacting properly.

Glue Constraint Attributes

Glue Constraint Full Network
After the Fracture was confirmed to be finished, then it was time to create the small debris particles that would fly out from the cracks at the time of breakage.
Most the networks from here on out did not need many changes from the base setup provided by the Debris dop on the Rigid bodies shelf. Only changes regarded to the time of spawn, spawn rate, and shape of the small debris pieces. When it came down to the simulation of the debris particles the popsource was changed to where it would stop any constant spawn activation after a certain frame so there wouldn’t be any un-needed constant spawning of particles.

Popsource Attibutes
After the particle spawning rate was changed, the only other portion of the main network that was changed compared to the base setup provided, is that I turned off pop interact due to the heavy pulling it was doing to the particles after they have hit the ground.

Debris Dop Network
Finally, I was able to apply small rectangular cubes to the particles using a copy to point node so that the particles would not be sphere shaped. Though I also applied a wrangle node to the particles prior so that they would have random pscale and orientation by the time the particles of debris hit the ground.
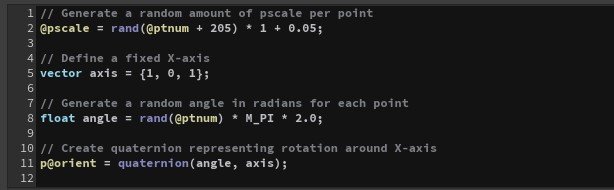
Pscale and Orientation Wrangle

Debris Shape Network
Finally, I was able to move ahead and complete the scene look development setup to try matching materials and lighting that was shown in the original reference. With all of the work shown prior and after, I was able to finish the file to as exact as I can with the caveat that I was not able to add a label due to issues with textures and geometry setup. My Final Work is as shown below.